Making a Cased-In Photo Album: Tools and Materials
August 31st, 2007 | Link
In this section, I’ll cover some of the tools and materials required to make your own hard cover photo album.
Materials

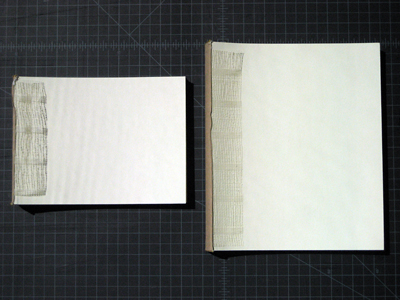
Album blocks come in a variety of sizes. The pages are usually cream or black, with glassine sheets between the pages to protect the photos. They also have spacers between the pages so that when you add photographs, the front of the book doesn’t swell open wider than the spine. They are available online from Hollander’s and Paper Source; Paper Source stores I have visited have had a limited selection available in the store. I usually buy from Hollander’s, which gives a 20% discount if you buy in sets of five. Paper Source is more expensive but includes pre-cut cover boards with the block.
The cover boards are made of book board, which is often referred to as binder’s board or Davey board, after one of the manufacturers. Book board comes in a variety of thicknesses; I use .098″ Davey board for most of my projects. A full-size sheet is 26″ by 38″. Paper Source and Hollander’s sell quarter-sheets (13″x19″), and some other suppliers (including Dick Blick) sell packages of four quarter-sheets from Lineco (which I think are over-priced). However, quarter-sheets will not be wide enough for book blocks wider than about 12″. If you plan on making a lot of books, you can buy full or half-sheets (26″ by 19″) online from Talas; they have a 10 sheet minimum, but are more cost effective than buying the smaller boards. Large art supply stores also often sell full sheets.
In addition to the cover boards, you will also need a light, flexible sheet of cardboard, such as card stock, for the spine.
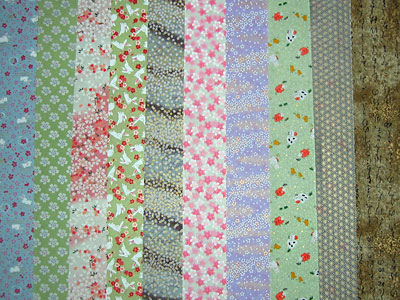
There are many different kinds of decorative paper available these days – so many it may be hard to choose just one! Almost any paper will work, although very thin papers (such as tissue paper) are difficult to glue to the cover boards without wrinkling, and very thick or textured papers can also be difficult to work with. Some online sources for paper whom I’ve been happy with are Paper Source, Hollander’s, Talas and Paper Mojo. I have a particular fondness for the Japanese Chiyogami papers, which are silkscreens on rice or mulberry paper: they’re easy to work with and come in a broad range of designs. Here are just a few samples:

The spine is covered with a book cloth that is complementary to your cover paper. Like the decorative papers, book cloth comes in a wide variety of colors and textures. The paper-backed book cloths are easiest to work with. Paper Source sells pieces about 20″ by 27″, and Dick Blick sells pieces about 17″ by 19″. These are mostly flat, close-weaved linen or rayon book cloths, which are great for many projects. However, if you want some of the more exotic, textured cloths (like some of the Japanese book cloths), you will probably have to buy them by the yard. It’s more cost effective to buy book cloth by the yard – you’ll get as much book cloth as buying four of the smaller pieces for about half the price – but if you only plan to make one or two books, you’ll only use a quarter of it. Bookbinding suppliers such as Talas or Hollander’s sell sample books that will give you a better idea of the actual color and texture of the cloth.
Blotting paper is used to soak up moisture from the glue while your case dries. You can use pages from an old telephone book, but if you plan on making many books I recommend buying a couple of large sheets of real blotting paper. You can reuse it many times. You’ll also want some sand paper (about 180 grade) for smoothing the edges of your cover boards after cutting.
Finally, you will need something to hold all the pieces together. Hardcore bookbinders generally make their own paste from wheat starch, but I recommend polyvinyl acetate (PVA), which is commonly available in art supply stores and online. PVA on its own dries very quickly, so you may wish to combine it with methyl cellulose to extend the drying time. This will allow you to reposition what you’re pasting, if necessary, whereas PVA alone is unforgiving that way. (I’ll talk about how to mix them further on in the tutorial.) You’ll want to keep a bunch of scrap or wax paper on hand, for keeping glue off your work area.
Tools

You will need a utility knife (the kind with snap-off blades), a steel ruler, a pencil, a bone folder, and a brush for pasting. A carpenter’s square is handy for ensuring your corners are at right-angles, and I recommend buying one of you plan on making a lot of books. (I bought mine for $3.99 from Amazon.com; you can also find them at any hardware store).
You will want either a self-healing mat or some scrap cardboard for cutting on.
If you don’t have a book press, you will also need at least one large, hard-cover book, a bread board, or some other flat, smooth board (larger than the cover for your book) that you can stand on when you glue the book block to the case (I know that sounds weird, but it will make sense later), and either weights or some good, solid, heavy books to weigh down the case while it dries. I have a couple of five pound free-weights that work great for this, but I got along for several years with just some heavy books.
Next, we’ll cover cutting the cover boards and spine piece.


No Comments
RSS feed for comments on this post.