Making a Cased-in Photo Album: Cutting the Cover Boards and Spine Piece
September 1st, 2007 | Link

Previously, I talked about tools and materials you’ll need for making a cased-in photo album.
In this section, you’ll learn how to measure and cut the book board and spine piece. My sample book block is a 30-page, medium-sized album block from Hollander’s, but I’ll explain how to measure for any block size.
Step 1: Measure the Book Block
All of your measurements will depend on the size of your book block. So to start, measure the width and height of the first page of the block. My page is 8" wide by 9 5/8" high.
The spine of your block is probably slightly rounded. The easiest way to measure a rounded back is to take a piece of scrap paper, press it against the curve of the spine, and mark each edge. Then measure the distance between the two marks. This is your spine width. For my 30 page book block, the spine is 1 3/8" wide.
Step 2: Measure and Cut the Cover Boards
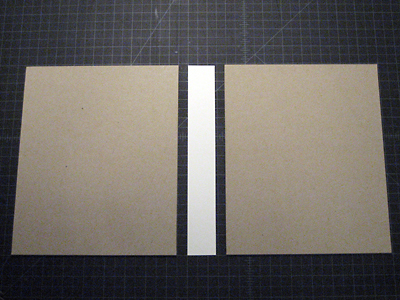
You’ll want your cover boards to have a lip of about 1/8" beyond the top and bottom of the book block. So, add 1/4" to the height of your book block to obtain the height of your cover boards. For my sample book, my board height is 9 7/8"
You will also want your cover boards to extend aboug 1/8" beyond the fore edge of the book block (the edge opposite the spine). However, your cover boards aren’t going to sit flush against the spine edge, because you’ll have a small gutter between the boards and the spine piece, where the hinge occurs. So the width of your cover boards is the same as the width of your book block – in my case, 8".
Before you cut your book board, you need to know the direction of the grain. Paper (and book board) is made up of many fibers compacted together. In machine-made papers, the fibers usually end up going in one direction, due to the sluicing movement of water through the machine. Paper folds and turns more easily when the folds are "with" the grain, which is why page grain usually runs parallel with the spine of a book. Paper also tends to expand in the grain direction when wet, so when you cut your cover boards, you want the grain of the book board to run in the same direction as the page grain – parallel to the spine.
A full sheet of bookboard, at 26" by 38" inches, is "grain long", which means that the grain runs parallel to the 38" (long) edge. The 13" by 19" quarter-sheets are also grain long, with the grain running parallel to the 19" edge. But a 26" by 19" sheet is grain short, with the grain running parallel to the 19" edge.
Book board is hard to cut. Make sure you have a fresh blade in your utility knife (an Xacto knife is really not strong enough to cut book board – don’t even try it). Draw the blade of the knife with even pressure along your metal ruler or carpenter’s square from the top to the bottom, then repeat this action over and over. Don’t try to saw through it or cut all the way through in the first pass. It will take you six or eight or more cuts to go through a single piece.
Cut two pieces of book board to the width and height you just calculated. (This is where your carpenter’s square comes in handy.) For my sample book, this is 8" wide by 9 7/8" inches high. If I were cutting from quarter-sheets, I would need two quarter-sheets in order for the grain to be parallel to my 9 7/8" edge – don’t try to cut both pieces from a single quarter-sheet.
Step 3: Measure and Cut the Spine Piece
Cut one piece of card stock the same height as your cover boards and the width that you measured earlier for your spine. For my sample book, this is 1 3/8" wide and 9 7/8" high.
Step 4: Sand Cover Boards
The edges of your cover boards will probably be slightly rough or uneven. You can fix this with some medium-grade sandpaper (about 180): hold the two boards together and lightly sand the edges. Try to sand the edges of both boards evenly, so that when they’re on the book they match.
While you have the sandpaper out, give each edge of the front and back of each board two or three light passes at a 45 ° angle. This rounds the edges and corners a bit, which will make the cover more pleasant to hold.
Next, I’ll explain how to measure and cut the book cloth and decorative paper for the case.


No Comments
RSS feed for comments on this post.