Making a Cased-in Photo Album: Assembling the Case
September 3rd, 2007 | Link
Previously, I explained how to measure and cut the cover boards and spine piece and how to measure and cut the decorative paper and book cloth for constructing the case.
In this section, you’ll learn how to assemble the case. Put down some waxed paper or scrap paper, because today we’re going to glue!
Keep a damp cloth close by when gluing, and change out your scrap paper or wax paper frequently. It’s very disappointing to discover that you’ve accidentally set your beautiful paper or book cloth in some leftover glue. Wipe your fingers quickly whenever you touch the glue. I like to rip off a dozen sheets of wax paper and stack them beside me before I start gluing. I fold over the glued part as I use each sheet, and grab a new sheet as I need it.
As I mentioned in the first part of this tutorial, Tools and Materials, I recommend using polyvinyl acetate to glue things together. It’s easy to find, doesn’t involve a lot of fuss to make, is mostly archival, and dries quickly and clear. You can use it on its own, but if these are your first books, you will probably want to slow down the drying time a bit by adding methyl cellulose. PVA on its own dries so quickly that you have little chance of repositioning your paper or book block once you place it. A PVA/methyl cellulose mixture will allow you to lift or slide the paper around to straighten it if you make a mistake.
Methyl cellulose comes in a powder. To use it, you first dissolve the powder in water as per the instructions and leave it overnight. It will form a thick, clear, slimy fluid (it is non-allergenic and non-toxic, making it a favorite for movie special effects wherever slime is called for) and will keep, if sealed, for about a month. Mix approximately three parts PVA to two parts methyl cellulose (60/40) and use this mixture for pasting.
Step 1: Mark Guidelines for Gluing
On your spine piece, make a mark at the top and bottom of the card stock, half-way between the edges. (For a 1 3/8" wide spine, the mark is at 11/16".) Always measure from the same side edge (left or right edge), so that the marks are aligned.
On the back of your book cloth, make a mark at the top and bottom again, half-way between the edges. Line up your ruler on these marks, and draw a 3/4" line vertically from the top edge down, and 3/4" vertically from the bottom edge up. Then draw a short (about 1/2" horizontal line 3/4" from the bottom edge (turn the vertical line into a “T”). You’ll use these lines to line up your spine piece when gluing.
Turn your front and back decorative paper pieces so that the back is facing you. (If your pattern has a vertical direction, make sure that both pieces are going the same direction.) Mark a light line 3/4" from the RIGHT edge of the BACK piece, from top to bottom. (Don’t press too hard: you don’t want the pencil line to be visible when the book is finished.) Mark a light line 3/4&quo;t from the LEFT edge of the FRONT piece, from top to bottom. You’ll use these lines to position the cover boards when gluing.
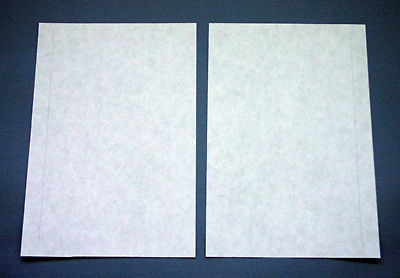
Step 2: Glue Spine Piece to Book Cloth
Place the book cloth on a piece of wax paper with the cloth side facing down. Move it aside for the moment.
Place the spine piece on a piece of wax or paper with the marks you made in the last step facing down. Hold the spine piece in place with the fingers of one other hand so that it doesn’t slide around, and apply a layer of glue evenly to the side facing you. You’ll have to stick your fingers in the glue at some point so you can cover everything.
Wipe your fingers on the damp cloth.
Pick up the spine piece at the top and bottom edges, and turn it over. Align the center marks with the vertical lines on the book cloth, and align the bottom of the spine piece with the horizontal mark you made at the bottom of the book cloth. Press the spine piece down and run your fingers over it to glue it down firmly. You’ll probably get glue seeping out under the edges; you can wipe these up with your fingers. Put something flat and heavy on the spine piece to keep it flat, and let it dry.
Wipe your fingers on the damp cloth and clean up any leftover glue.
On the back of the book cloth, draw light vertical lines 1/4" from each side of the spine piece. Hold the book cloth steady by placing your fingers on the spine piece, and apply glue from the right line to the right edge of the book cloth, for the entire length of the book cloth. Drag the brush right off the edge of the book cloth onto the wax paper – you want the glue going to the very edge. Very carefully pick up the book cloth so that it doesn’t slide into the glue, and place it – with the glue still facing you – on a clean piece of wax paper. Place the back cover board on top of the glue, aligning the left edge with the line and the top and bottom with the top and bottom of the spine piece. Press the board down firmly, then pick up the board and book cloth and flip it over so that the fabric is facing you. Press out any air bubbles in the book cloth where it meets the board (wiping your fingers first). Repeat for the front cover.
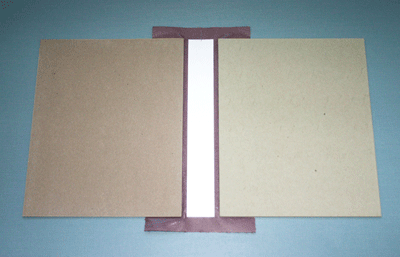
Apply glue to the 3/4" flaps of book cloth at the top and bottom. Fold the flaps to the inside of the spine piece and cover boards, and glue them down. Use your bone folder to gently push the book cloth against the edges of the cover boards – don’t press too hard or you may tear the cloth.
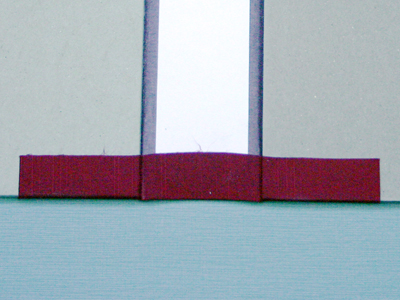
Your spine piece and cover boards are now attached to the book cloth. Set this aside to dry flat under weights for a few minutes.
Step 3: Glue Decorative Paper to Cover Boards
Place the decorative paper for the back cover face down on a clean sheet of wax paper, and apply glue from the flap line outward, to cover the entire sheet except for the flap. Try to apply the glue evenly, but not too thinly. Depending on the paper, it will probably soak up some of the glue when you first apply it, and the glue will seem to dry. Apply more glue until it stays wet.
Many papers will curl when you apply the glue. This is because the grain is stretching as the paper gets wet. Usually, if you leave the paper alone for a moment or two after it starts curling it will relax again as the fibers are saturated. For particularly stubborn curling, try “tapping” the paper before you apply the glue: with the right-side up, fold one side toward the front, and give it a quick tap so that there’s a slight fold line in the middle of the paper. It will disappear when you paste the paper to the board. (Try this a couple of times first so you don’t ruin your good paper.)
Place the paper glue-side-up on a clean piece of wax paper, with the flap line at the top. Align the fore edge of the back cover with the line, with the top and bottom edges of the board 3/4" from the top and bottom edges of the cover paper. Gently lower the cover board so it all touches the paper. Pick it up again, and place it on a clean piece of wax paper with the decorative paper facing you. Use your fingers to smooth the paper against the board, pressing out any air bubbles. Pay extra attention to the edges of the board: run your fingers along the edge so that the paper folds a little, but don’t fold the flaps over just yet. Carefully wipe away any glue that leaks out onto the book cloth at the spine edge.
Repeat these steps to glue the decorative paper to the front cover board.
At each corner of the fore edge, trim the decorative paper at a 45° angle about 1/8" from the corner of the board. This will reduce the bulk in the corners when you fold under the flaps.
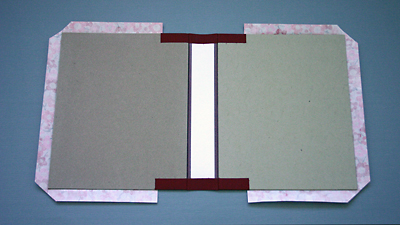
Apply glue to the bottom flaps, then fold them to the inside of the cover board. Press firmly in place and smooth out any wrinkles. Try to get the paper as close to the board for a good, crisp edge. Repeat for the top flaps. Use your bone folder to fold in each of the corners so that the paper is smoothed down to the side of the board. Apply glue to the side flaps, and fold them in as you did for the top and bottom. You now have a completed case.
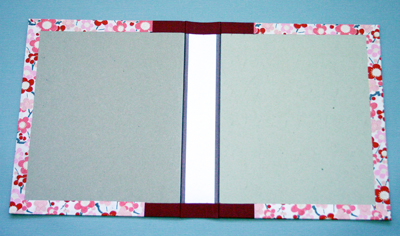
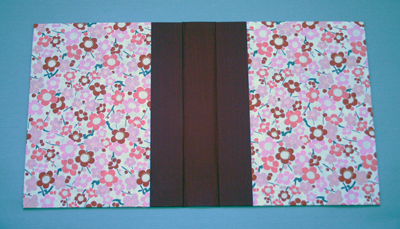
Place the whole case under books or boards and weights so that it dries flat. If you have blotter paper, place the blotter paper underneath the case and between the case and the books or boards. You can use ripped out pages from an old telephone book in the same way, but place a sheet of wax paper between the ink and your case to prevent any undesirable bleeding onto your case.
This will take several hours to dry: overnight is better.
In the next and final step, I’ll explain how to attach the book block to the case, which is known as “casing in” the block.


No Comments
RSS feed for comments on this post.