Archive for Cloth

Adventures in Sewing from Japanese Patterns
July 3rd, 2009 | Link

Green linen sleeveless top from Every Day Camisoles and Dresses

Recently I’ve been inspired to try sewing from Japanese pattern books. I purchased some books from Pomadour24’s Craft Café on Etsy and was very happy with the experience—the books arrived from Japan in about a week. There are several stores on Etsy that sell them, and in most cases the sellers have photographed or scanned pages from the books so that you can see what the patterns look like. I’ve also been reading Japan Couture Addicts, a French blog by Japanese sewing fans who post their creations. It’s a little weird to be reading in French about Japanese patterns, and I only get about half of it (I studied French for 10 years at school, but haven’t had much occasion to use it in the 25-odd years since), but it’s interesting to see how the finished garments look on different body types, and to see how people have modified the patterns. A couple of times I’ve dismissed a pattern at first look, then seen how someone else had made it up and fallen in love with it.

If you’ve done basic garment sewing, it’s not hard to follow the patterns. The biggest challenge is usually finding and tracing all the pattern pieces from the giant piece of paper that accompanies the book. Once you’ve traced the pieces, you also have to add in the seam allowances, which I was struggling with a bit—straight lines are easy, but curves were a bit of a pain until I discovered this brilliant tip of using the sewing machine. I also found a lot of useful information from this series on sewing from Japanese craft books and from this list of translations.

Denim box-pleat skirt from Machiko Kayaki's book, Simple Chic

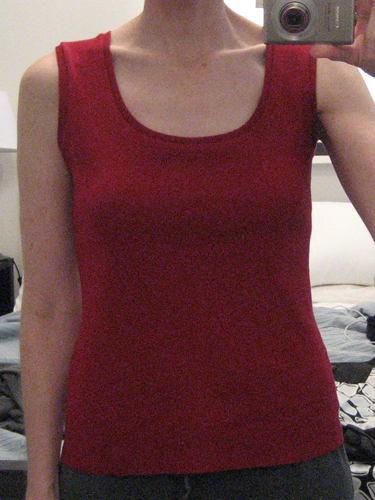
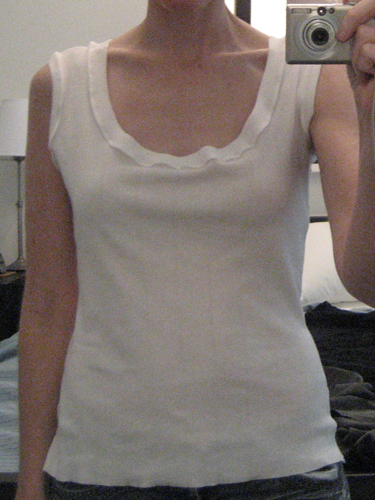
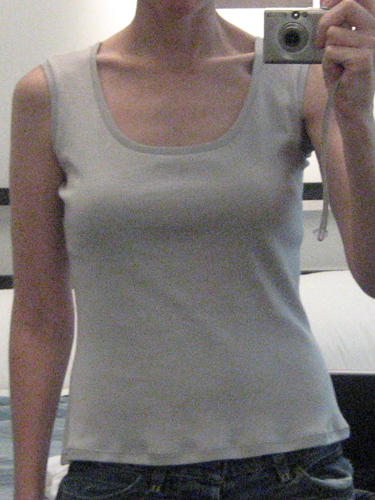
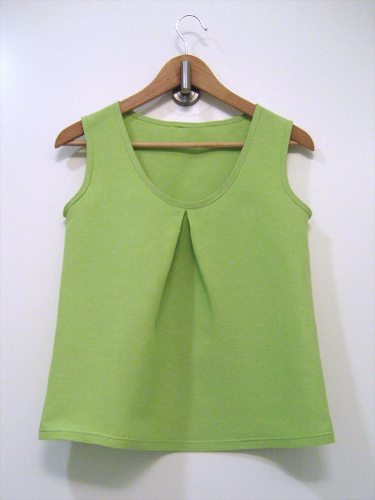
So far I’ve made a couple of summer tops and a skirt (sorry, not the best photo of the skirt—it was really windy that day), and the muslin for a dress that I might sew up with what’s left of this long weekend. There will probably be quite a few more postings on this subject in the weeks to come.

The Replacement Messenger Bag
May 26th, 2009 | Link

Last August I made a black corduroy messenger bag from a slightly modified version of the Burda Style Diana pattern. And I was happy with it, except for a couple of things. First, it had no pockets or separations in it of any kind, and my keys, cell phone, etc. kept falling to the bottom of the bag. Second, the strap was just slightly too short, because I ran out of fabric when I made it.

With this in mind, and influenced by Kirsten’s bags and by my old Jack Spade bag (in a style no longer made), I revamped the Diana pattern and came up with this:

Messenger bag

The flap fabric is the Urban Type design from Green Olive Textiles on Etsy. The other fabric is a light-weight denim stretch fabric I bought a while back on eBay (I made a skirt from it, and had some left over). I feared originally that I should have used interfacing to sturdy up the shape, but now that I’ve worn it everywhere for the last month or so, I like the slouchiness of it. It curves around my hip when I wear it alone, or flattens out against my lower back when I’m carrying it under my commuter backpack. It sinks against the wall or down to the floor when I put it down. It’s casual.

(After I sewed the outside of the bag, and was ready to attach the flap, I was suddenly nervous about having the Urban Type fabric facing outward. I was very tempted to put the Urban Type fabric on the inside of the flap, and have the whole outside of the bag made of denim. But my husband talked me out of it, and wisely so.)

Messenger bag - strap and bottom detail

The seat belt webbing strap idea came from Kirsten. The 1-1/2″ wide webbing was purchased from Seattle Fabrics, along with the slide and other hardware (including a key ring hook). I used the adjustible strap tutorial from You Sew, Girl.

Messenger bag - outside pocket detail

The bag is lined with red linen that is pretty close to the Urban Type background. This time I added an outside pocket that makes up the full width of the bag and starts about two inches down from the top. This is great for my work badges, passport and plane tickets while I’m at the airport, etc.

Inside, I added a zipped pocket for my wallet and a slip pocket for my phone (following the Sew, Mama, Sew tutorials), and a hook for my keys. There is also plenty of room in there for my journal, iPod, and glasses, a paperback, and even a small knitting project. (When I made the black corduroy bag, I reduced the width and height by an inch each. This time, I used the original pattern dimensions.)

Quilt for Finn
April 22nd, 2009 | Link

Finn all cozy in his quilt

First, let me apologize for being AWOL so long. Things have been crazy busy, are crazy busy, and will continue to be crazy busy for just a little longer yet—until the end of the month I think.

In the meantime I offer you this photo of my adorable three week old nephew Finn, wrapped up in a quilt made by his auntie. I did most of the sewing last October, but then procrastinated on the binding until I needed to hurry up and mail it to arrive before the baby did, and with everything else going on I forgot to photograph it. Doh.

I do have a couple more projects to show off, but you’ll have to wait. Not much longer, I promise!

A Stocking Explosion
November 8th, 2008 | Link

Stocking ornaments

Um… I may have gone a bit overboard on the stocking ornaments. It’s just so easy to make multiples…

The Stockings Were Hung by the Chimney with Care
November 2nd, 2008 | Link

Stocking ornaments

I had a number of small scraps of linen after sewing this tote and this skirt, so I used those and dug into some of my old stash of quilting fabrics to sew up a bunch of ornaments. I thought they turned out pretty well—kind of Zakka-esque—so I’m sharing the cuteness with a free, no-strings-attached (no pun intended) PDF of the pattern, and an accompanying photo tutorial.

The finished stockings are about 3″ wide by 3 1/2″ high. I like mine plain, but you could embellish them with embroidery or fabric paint. Make a few to hang on the tree, or make a garland; stick a card inside and use one as a gift tag, or stick one on some card stock and make a Christmas card.

Read more…

Some Sewing Tips and a Wardrobe Remix
August 31st, 2008 | Link

Still on a sewing kick. I found a few useful links recently:

I took a critical look at my wardrobe this weekend and thought hard about the pieces I like (or don’t), the pieces I wear (or don’t), and the pieces I would like to have (but don’t). A lot of clothes went to the donation pile, including some that I liked passably but rarely wear because they are difficult to launder or press, or that don’t fit me well and are beyond my ability to alter; and some that I don’t wear because they don’t fit my style. What’s left are pieces I wear all the time, or are my favorite dressy pieces. What’s coming are a couple more casual-to-business-casual skirts and pants, some dressier t-shirts and tops to wear to work with all my skirts and jeans, and a couple of classic shift dresses. I’m sticking with my mostly black and gray palette, with a few whites and bolder colors (mostly reds) mixed in. I bought a few yards of new fabric—cotton twill in a couple of neutral colors, and some cotton and rayon knits—to fill in some of the gaps: I’ve realized I like the comfort and easy care of knits, and they don’t have to look as casual as my uniform Gap T’s. What I hope to get out of this exercise is a wardrobe that I’ll wear all the time, that I feel good in, and that looks like I thought about what I put on.

Black Corduroy Messenger Bag
August 27th, 2008 | Link

Messenger bag

I have a small blue Jack Spade messenger bag that I like a lot, but I often wish I had bought a black one instead. I bought some black corduroy with the intention of reverse-engineering the original bag and making my own—that was months ago. But BurdaStyle recently put up a pattern for a messenger bag, so I decided to try that out. I changed the pattern to be an inch narrower and an inch shorter, and the resulting bag is just the right size for a magazine or a couple of books, sunglasses, and wallet. I lined it with a fun, bold Prints Charming cotton print left over from a skirt I made last January. (There’s another view of the bag on the Burda Style site that shows the lining.)

If I were going to make another—and I might (I’m such a bag geek)—I would probably add a zipped pocket inside and a loop for keys, and make the strap adjustable. It’s very quick to sew once you get all the paper taped together to construct the pattern pieces.

Random Sewing Blather
August 11th, 2008 | Link

Reason number 7,534 why I love the internet:

I found myself on the Wardrobe Refashion site yesterday, and in particular this post about the Sadie top that the writer had sewn from organic bamboo jersey. I haven’t tried this variation of the top because the fabrics I had don’t drape very well, but hers is beautiful! I followed the link to the sewer’s blog and read how she adapted the Sadie pattern to get the softer drape, and as I read further found a link to a post on how to work with stretch fabrics. And there, folks, appears to be the answer to my stretched out t-shirt seams. Yay!

Discount Fabrics has begun carrying a small selection of organic fabrics in their new location on 11th Street between Howard and Folsom in San Francisco, so I picked up a yard of bamboo jersey there yesterday and I’m going to have a go at that Sadie variation. The bamboo fabric is super drapey and has a slight sheen to it, so I think it will look great as a dressier top.

I spent some of the weekend working on Burda 8601 (view B, without all the foufy lace—I’m shooting for something more like this variation), which may have been just a touch beyond my sewing skills (the fact that I made it from Dupioni silk, which is very fine, may not have helped) but it came out all right. I took out the side zip in favor of a corset-style lacing up the back. It’s hard to say how it’s going to fit—I still have to put in the eyelets for the laces—and I’m a little nervous about how it will stay up! Hoping to finish it sometime this week.

One More Sadie Top…
August 5th, 2008 | Link

I had a couple of hours to spare before E. gets home, so I thought I’d do one more Sadie top. This knit is heavier than the other two and came from a sample sale at Discount Fabrics. I didn’t try to hem this top, as I want to explore the stretching problem first. But I did redraft the pattern a little: I dropped the arm holes almost an inch, and I took in about an inch of the width I’d added to the bottom (it’s still wider right at the waist, but tapers in again at the hips):

Tank top #3

This one is almost perfect. If I can work out my top-stitching and hem problems, I’ll be very happy with it. I do love how fast they come together with the serger!

Maybe I Should Stick with Wovens…
August 5th, 2008 | Link

Yesterday I suffered a spectacular failure sewing the Sadie tank top pattern from Burda Style web site. I used the size 34 version, and smoothed it into a size 36 from the waist-line down for a little extra ease. The fit was fine, but I had some problems with the neck and arm openings:

Finished tank top #1, with a saggy baggy neckline

I think the problem was a combination of things: I should have pulled the ribbing fabric tauter when I sewed it to the body; I should have used a longer stitch length on the serger so that the body fabric would ease in; and I totally stretched it out when I topstitched with the twin needle. Keeping all that in mind, I had another go at the top today, and here’s take two:

Finished tank top #2, with a much improved neckline but flaring at the bottom hem

As you can see, the neck and arm holes are much better here. But I still got a lot of stretching and flaring when I hemmed the bottom with the twin needle on my sewing machine, so I haven’t done the top-stitching on the neck and arm holes because I don’t want to totally ruin it. I think it’s a tension thing, or the feed dogs stretching the fabric out on the bottom.

On the bright side, I bought both fabrics for $1.99/yard from fabric.com when they had a sale on baby-rib knits, so I’m not too upset about it. A little frustrated, but not upset. The second top is wearable. I like the fit and the shape on the whole: I dropped the bottom of the armhole opening about 1/2" on the second top and I think its still a bit high (note the bunching under the arms), so I’ll try dropping it some more. I could see making a few of these for summer tops or layering for work, once I get the kinks worked out.

Search

About

My name is Shannon Hale. This blog is on indefinite hiatus, but it contains archives of the last 10 years of posts about bookbinding, knitting, sewing. and other random things in my life.

Previously

2014: 1 2 3 4 5 6 7 8 9 10 11 12

2013: 1 2 3 4 5 6 7 8 9 10 11 12

2012: 1 2 3 4 5 6 7 8 9 10 11 12

2011: 1 2 3 4 5 6 7 8 9 10 11 12

2010: 1 2 3 4 5 6 7 8 9 10 11 12

2009: 1 2 3 4 5 6 7 8 9 10 11 12

2008: 1 2 3 4 5 6 7 8 9 10 11 12

2007: 1 2 3 4 5 6 7 8 9 10 11 12

2006: 1 2 3 4 5 6 7 8 9 10 11 12

2005: 1 2 3 4 5 6 7 8 9 10 11 12