Reusable Cloth Grocery Bags in Five Lunch Hours or Less – Day Five
August 17th, 2007 | Link

I miscalculated the effort and only had time to finish four of the bags today. I still need to reinforce the handles on the two remaining bags.

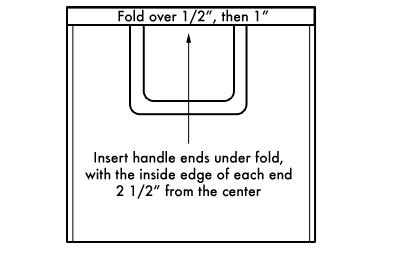
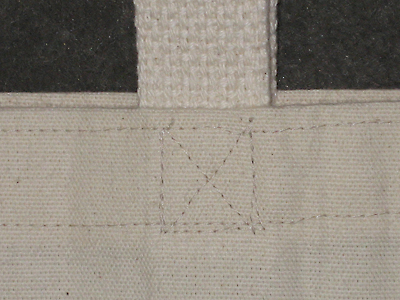
Reinforcing the handles is just a matter of sewing a square and an X through the two layers of handle and the top hem of the bag, but it takes a couple of minutes for each handle end (mostly pausing to turn the bag at each of the points).

Handle reinforcement detail

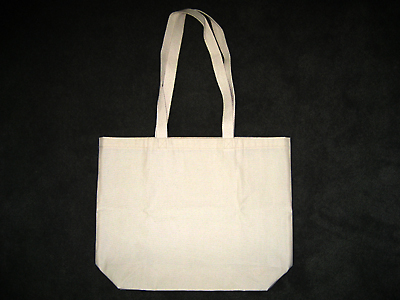
The last step is to square off the bottom of the bag so that it sits flat. The easiest way to do this is to first iron the bag flat while it’s inside out, so that the bottom has a sharp fold. Take a pin and poke it through the fold about 2" from the bottom corner. Then poke the pin through the side seam, fasten the pin, and flatten out the triangle that it forms. Draw a line perpendicular to the seam 2 1/4" from the corner point, from one edge of the fabric to the other, and sew that line. Repeat for the other corner. UPDATE: Crafty Daisies has a photo tutorial on how to square bags that’s a lot clearer than my instructions.

Turn the bag right-side out and give it a good pressing, and it’s done. All told, it took about 30 minutes per bag.

Finished bag!

I am still thinking about what to put on the front and back of the bags. I think I might dye them a different color and then think about silk-screening or painting on them. I have the urge to paint huge, bold, tribal, flash tattoo art all over them but I think I’ll get over that quickly.

Reusable Cloth Grocery Bags in Five Lunch Hours or Less – Day Four
August 16th, 2007 | Link

Having pinned the handles in place, I’m ready to sew them down.

Starting at one of the side seams, sew around the top of the bag about 1/16″ from the bottom folded edge of the hem, sewing through the folds and the inserted bag handles.

Now fold the handles up, over the hem and the seam that you just sewed, so they come up out of the top of the bag. Pin them in place, then sew a second seam, this time 1/16″ from the top of the bag, sewing through the second layer of handles.

All that’s left now is to reinforce the handles and shape the bag bottom, and I’m done.

Reusable Cloth Grocery Bags in Five Lunch Hours or Less – Day Three
August 15th, 2007 | Link

Having sewn the side seams, I now have six vaguely bag-shaped pieces. Today is a pressing day. (Or depressing if, like me, you always burn your fingers on the steam.) First step: get the iron heated up and ready to steam. The canvas doesn’t hold the press very well without heavy steaming.

First of all, turn all the bags right-side out and press the side seams. Then turn all the bags right-side in again.

Fold 1/2" all around the top of the bag toward the outside (wrong side of the fabric), and press it down firmly. This is a pain, but it will save you on pinning when you sew.

Now fold another 1" over all around the top of the bag, in the same direction as the first fold, and press it down firmly. What you have now is a 1" hem with no raw edge showing, on what will be the inside of the completed bag.

Find the center of each side of the bag by folding the two sides of the bag together and marking the center point on the front and back with pins.

On the front of one bag, insert each end of one handle under the folded hem so that the end is flush with the fold and the inside edge of the handle is 2 1/2" away from the center pin. (There will be 5" total between the handle ends.) Make sure you don’t twist the handle. Repeat this step with the back of the bag, and then repeat for the front and back of each remaining bag.

Pattern showing seam placement

Tomorrow I’ll sew the hems and the handles in place.

Reusable Cloth Grocery Bags in Five Lunch Hours or Less – Day Two
August 14th, 2007 | Link

Having cut and pinned the fabric for the bag, it’s time to sew the side seams. The bottom of the bag is the fold, so there’s no worry about stress on a bottom seam. For the side seams, I sew up each side of the bag (where I pinned yesterday), 1/2" from the edge. I also sew a second seam about 1/16" away from the first, between the first seam and the raw edge, just for strength.

Pattern showing seam placement

Since canvas tends to fray, and since I’m not lining the bags, I also sew one more, zig-zag seam along the raw edges to finish them. Total sewing time (for six bags): 30 minutes.

(If you like a more finished look, but don’t want the bulk of a lining, you could sew a strip of bias tape over the raw edges. If you’re looking for a nicer tote, say for the beach, you could cut and sew a lining of lighter fabric in the same way that you made the outside of the bag.)

Reusable Cloth Grocery Bags in Five Lunch Hours or Less – Day One
August 13th, 2007 | Link

At the end of September, a law will go into effect in San Francisco preventing large supermarket and pharmacy chains from bagging customer purchases in plastic bags. It will be interesting to see how this transition goes over: whether it makes any discernible difference to the volume of plastic bags in landfill sites and of litter, whether it will cause the predicted price increases, whether everybody will suddenly start bringing their own bags when they shop, whether people who can’t afford to buy reusable grocery bags are going to be screwed, etc.

We have some cloth grocery bags, mostly swag bags from several trips to SXSW. They are super-sturdy. But we often use them to take items destined for donation to our storage unit, and then we don’t have any bags until we make a donation run. And we don’t like logos in our house (even SXSW logos). And I felt like sewing, and doing some silk-screening, and I thought they might make nice gifts, so I decided to sew up some grocery bags.

I usually leave work and go home for lunch. I know this is a luxury, but I’m sure you can find a few hours of time here and there yourself.

Day One: Cut and Pin Fabric

I want plain, sturdy fabric for my bags because I intend to silk-screen on them later, so I’ve opted for unbleached cotton canvas in about a 10oz weight. The discount fabric store around the corner sells 58" wide canvas for $3.98/yard: this is enough for three bags.

I also opted to buy cotton webbing for the handles rather hemming and sewing the canvas into strips. 1" cotton webbing runs for $1.69/yard; I like long handles, so I need two yards per bag.

I also bought a spool of thread for just under $3. Total materials cost: about $4/bag.

For handles, cut six pieces of webbing 32" long.

For bags, cut three pieces of fabric 19" wide by 36" long. This is easy to cut from a 1 yard piece of 58" fabric by folding the fabric in half widthwise, and making three cuts 19" apart (using the fold to measure right-angles for the sides). If your fabric isn’t quite straight and you can’t get a perfect 18" out of it, it doesn’t matter that much – a half-inch or an inch off the height of the bag isn’t a big deal. Similarly, if your fabric isn’t wide enough – or is wider -take what you can get and make the bag slightly wider or narrower, to minimize scraps.

If you didn’t already fold the fabric to cut it, fold the bag pieces in half widthwise now. This gives me three 18" high by 19" wide rectangles with a fold on the bottom. If your fabric has a right side, fold the fabric with the right-sides facing.

With the fold at the bottom, pin up the two sides of the rectangles, leaving the top open. Depending on how organized you were, all this probably took you less than half an hour.

Time for me to go back to work. Tomorrow, I’ll sew the side seams.

Like the Band?
March 13th, 2007 | Link

According to a study by social psychologists, musical preferences are good indicators of our personalities. In other words, there’s a reason for all those mix tapes we make for potential partners and friends.

Bartering Lines
March 8th, 2007 | Link

One of my coworkers, Jos, made one of my other coworkers (or actually, her bandmate) a steel device to help in measuring sound waves. It has a flat round base with a rocket-ship-shaped thing welded to it, the tip of which is really pointy and sharp. How pointy and sharp? Well, let’s just say that after playing with it for a bit the other day it’s a good thing I’m up to date on my tetanus shot.

On what would normally be a completely unrelated note, I finished a bunch of new photo albums last night (starting here on Flickr) and brought them in to work today to show to yet another coworker. And since Jos has a deep respect for handmade things (he’s building his own electric car) and he happened to ask whether I’d made any new books lately, I showed them to him, too.

When I first picked up the pointy sound-wave-measuring device, one of the first things that came to mind was that the base would make a good weight for bookbinding. It’s the right size, and heavy (being steel), and would be perfect for weighing down sections while I’m sewing. I bought two three-pound weights from Hollander’s a couple of months ago and those have worked out well, but I would like more, perhaps heavier, weights and between the cost of the actual weights and the added cost of shipping them I have held off getting any.

While Jos was looking at my books I asked where he’d gotten the steel for the sound-wave thingy, and what grew from that was a barter. He is going to make me a couple of steel weights to my specifications, with welded-on handles; in exchange, I will make him a custom photo album. I’m super excited about the idea. Bartering just seems so much cooler than selling.

Long Stitch Variations
July 23rd, 2006 | Link

Long stitch binding variations

I’ve felt like I’m in a Japanese-paper-covered-photo-album rut in bookbinding, so this weekend I broke out Keith Smith’s Volume I Non-Adhesive Binding:
Books Without Paste or Glue
and armed myself with some handmade paper from Flax and tried something I haven’t done before.

Read more…

Three Small Photo Albums and a Journal
June 29th, 2006 | Link

Kilim woodblock print photo album (approx. 8 inches by 6 inches, 30 pages)

Creativity is not necessarily tied to prolificacy, and I can be prolific, if not creative. These are all from last weekend. The nice thing about bookbinding is it’s easy to get handsome results without a great deal of skill. Much as I hate to admit it, the only real skill involved when using premade text blocks and beautiful papers is cutting a straight line and not getting glue all over everything.

Read more…

Grown-up’s Album
April 23rd, 2006 | Link

Small brag book with 10 black pages (approx. 6 inches square)

Around the same time I went through my baby-album-making frenzy, I also finished up this small photo album I made for my husband. I made the book block months ago but only got around to casing it in recently. The album is about six inches square with 10 pages of black Arches Cover paper which are glued together. I’m not thrilled with the book block, but it was an experiment. I like the dramatic cover though.

At some point I will fill it with small black and white photos. But that’s for another day.

Search

About

My name is Shannon Hale. This blog is on indefinite hiatus, but it contains archives of the last 10 years of posts about bookbinding, knitting, sewing. and other random things in my life.

Previously

2014: 1 2 3 4 5 6 7 8 9 10 11 12

2013: 1 2 3 4 5 6 7 8 9 10 11 12

2012: 1 2 3 4 5 6 7 8 9 10 11 12

2011: 1 2 3 4 5 6 7 8 9 10 11 12

2010: 1 2 3 4 5 6 7 8 9 10 11 12

2009: 1 2 3 4 5 6 7 8 9 10 11 12

2008: 1 2 3 4 5 6 7 8 9 10 11 12

2007: 1 2 3 4 5 6 7 8 9 10 11 12

2006: 1 2 3 4 5 6 7 8 9 10 11 12

2005: 1 2 3 4 5 6 7 8 9 10 11 12