Archive for patterns and tutorials

I for One Welcome Our New Robot Overlords — I Mean, Coasters
July 6th, 2011 | Link

Three square coasters made from linen fabric screen printed with green and brown robots.

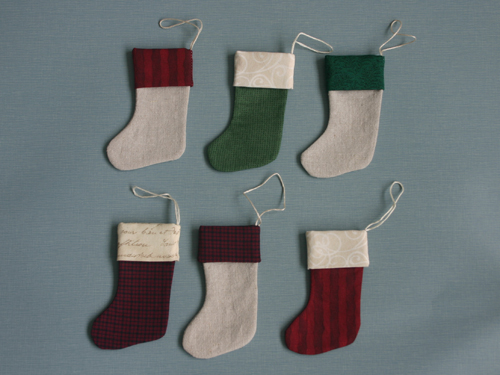
Things to do when one is procrastinating and has scraps of fairly expensive Japanese fabric that are begging to have something done with them. I’ve seen fabric coasters that have batting or flannel between the layers, but I didn’t bother. Finished size is a scant 3-3/4″ on each side.

Super Fast Instructions

Cut two 4″ squares of fabric. Curve the corners to make it easier to turn them inside out (I just followed the corner curves from the card wallet pattern around each corner — they have a 1/2″ radius). Place squares right sides together (if you want to add an extra absorbant fabric layer, place it on top of the other two pieces so it’s on the inside when you turn everything right-side out).

Sew around the perimeter of the coaster with a 1/8″ seam allowance, leaving about 2″ open along one side for turning. (Backstitch and the start and end of the stitching so it holds together while you’re turning.)

Turn right-side out and press flat. Fold raw edges from opening towards the inside and press so they’re straight.

Top-stitch around the entire coaster very close to the edge (I use the 2mm marker on my sewing machine foot), backstitching at the start and end.

You’re done. I told you it was going to be super fast!

Card Wallet Pattern and Tutorial
July 4th, 2011 | Link

Card wallet, closed, made of linen fabric printed with cartoon green and brown robots

Longtime readers may recall the fabric card wallet I made some time back. Today as I was, well, procrastinating on writing an article about designing keyboard-only interactions for web sites, I started cleaning my studio and found a bunch of fabric I’d cut to make more robot wallets. Then I decided to procrastinate on cleaning my studio and make robot wallets instead. And then I decided to write a tutorial!

Read more…

Felted Coffee Sleeves
February 6th, 2009 | Link

Coffee sleeves

This is the last of my Christmas knitting. I had some leftover Cascade 220 wool from the Habitat hat I knit for my dad for Christmas, so I decided to experiment with felting it into a coffee sleeve.

You can work the rows in garter (alternating knit and purl rows), stockinette (knitting every row) or seed stitch—I tried all three, and you can see the slight difference in texture in the photo between the stockinette (on the cup) and the seed stitch. Most of the stitch definition is lost during the felting process, but the garter stitch version seemed to produce the thickest of the three.

Pattern

You will need:

Needles: 4.5mm double-pointed needles (set of 4)

Wool yarn—Cascade 220 wool, Malabrigo, or others. Some yarn felts better than others so you might need to experiment. It doesn’t take a lot—I got three sleeves out of the remainder of the ball of Cascade 220 from the hat.

A coffee cup that you want the sleeve to fit over. Mine is a Starbuck’s tall cup. The sleeve stretches a bit, so it also fits the next size up.

Gauge: 18 stitches / 32 rows to 4″, in stockinette stitch in the round.

Knitting: Cast on 36 stitches and distribute evenly on three needles (12 stitches per needle). Join, making sure not to twist the stitches. Work 9 rows in the stitch of your choice.

Row 10: Work 12 sts, increasing one stitch in 12th stitch; repeat twice more. 39 stitches in total.

Work 9 more rows.

Row 20: Work 13 sts, increasing one stitch in 13th stitch; repeat twice more. 42 stitches in total.

Work 4 more rows. Cast off.

Felting: Fill sink with hot water (as hot as you can stand—rubber gloves help—and add enough detergent to make some suds. Wash the sleeve. Agitate it, rub it between your hands, rub it against itself, swish it around. Keep doing this until the wool begins to felt. It will shrink a bit, especially in the length, and it will thicken. You might have to drain the sink and add more hot water. Once the wool is felting, check that it fits over your coffee cup. Keep felting until it’s a firm fit. Leave the sleeve on the cup to dry.

The Stockings Were Hung by the Chimney with Care
November 2nd, 2008 | Link

Stocking ornaments

I had a number of small scraps of linen after sewing this tote and this skirt, so I used those and dug into some of my old stash of quilting fabrics to sew up a bunch of ornaments. I thought they turned out pretty well—kind of Zakka-esque—so I’m sharing the cuteness with a free, no-strings-attached (no pun intended) PDF of the pattern, and an accompanying photo tutorial.

The finished stockings are about 3″ wide by 3 1/2″ high. I like mine plain, but you could embellish them with embroidery or fabric paint. Make a few to hang on the tree, or make a garland; stick a card inside and use one as a gift tag, or stick one on some card stock and make a Christmas card.

Read more…

Cased-In Photo Album Tutorial
February 8th, 2008 | Link

Cased-in 8x10 inch photo album covered with a floral Japanese Chiyogami paper and raw silk bookcloth

This hardcover photo album makes the perfect gift and is easier to make than you might think. It uses a purchased photo album block, so most of the hard work is done already. All you have to do is assemble the cover (the “case”) and glue the book block in place. With the wide selection of book cloth and decorative papers available, it’s easy to customize an album for any occasion.

Although this tutorial talks about photo albums, there are many types of pre-made book blocks available, including blank journals, trip diaries, date and address books, and even wine and baby journals. These instructions will work for any type of book block.

  1. Tools and materials
  2. Cutting the cover boards and spine piece
  3. Cutting the book cloth and cover paper
  4. Assembling the case
  5. Casing in the book block

For more photo album pictures, visit my bookbinding stream on Flickr.

Search

About

My name is Shannon Hale. This blog is on indefinite hiatus, but it contains archives of the last 10 years of posts about bookbinding, knitting, sewing. and other random things in my life.

Previously

2014: 1 2 3 4 5 6 7 8 9 10 11 12

2013: 1 2 3 4 5 6 7 8 9 10 11 12

2012: 1 2 3 4 5 6 7 8 9 10 11 12

2011: 1 2 3 4 5 6 7 8 9 10 11 12

2010: 1 2 3 4 5 6 7 8 9 10 11 12

2009: 1 2 3 4 5 6 7 8 9 10 11 12

2008: 1 2 3 4 5 6 7 8 9 10 11 12

2007: 1 2 3 4 5 6 7 8 9 10 11 12

2006: 1 2 3 4 5 6 7 8 9 10 11 12

2005: 1 2 3 4 5 6 7 8 9 10 11 12