A Backpack Prototype
August 1st, 2011 | Link

Last year I stumbled on a pattern for an ultralight waterproof backpack posted by Jan Rezac from the Czech Republic. The pattern splits the pack into two parts: an outer shell that supports the shoulder straps and hip belt, and a waterproof dry bag that is strapped into the outer shell. The dry bag can be constructed from a very lightweight fabric because it doesn’t have any stress points for straps and it’s protected by the sides of the outer shell, and this allowed Rezac to get his pack weight down to 320 grams, or about 11 ounces. My pack is about 24 ounces and E’s is about 16 ounces, so the idea of an 11 ounce pack was intriguing.

I sent off for a bunch of fabric samples from Seattle Fabrics, and E helped pick the fabrics and other materials needed for the pack, and we ordered them… and then they sat under the chaise in my studio for a year. However, I finally got to the project, and here’s the first prototype:

The front view of a blue and black backpack with mesh pockets on each side. The interior bag is strapped inside the shell by buckled webbing.

Doesn’t look like much without the sleeping pad to give it some structure and with the dry bag all crumpled up inside it like that, but I still think it’s pretty cool. The various pieces are sewn from different fabrics, depending on stress and wear. The bottom is a sturdy 330 denier Cordura — tough and water resistant, for putting it down on the ground. The back is 200 denier coated Oxford — waterproof, and heavy enough to support the stress of the straps and hip belt. The sides and front are waterproof 140 denier ripstop nylon, to protect the inner bag from branches and other wear.

Here’s the back view:

Back view of the backpack, showing details of shoulder straps and hip belt.

The shoulder straps and hip belt are made of 1/4″ foam padding, which I perforated with a 1/4″ hole punch to further reduce the weight (marginally) and to allow it to breathe. There are also strips of grosgrain ribbon sewn to the back where the shoulder straps and hip belt are attached, to support the additional stress at those points. The hip belt is sewn in to the seam where the back and bottom meet, and attached to the lower grosgrain strip with short strips of heavy elastic, to provide support and accommodate the pack’s bouncing as you walk.

The side pockets are made of dive mesh, with a light-weight elastic gathering them into the protective sleeve at the top:

A close up of the blue mesh side pockets, which are gathered into a protective sleeve at the top edge.

The dry bag is made of heat-sealable fabric — the outside has a waterproof coating, and the inside has a heat-sealable coating. I sewed around it with about a 1/2″ seam allowance first, then used an iron to seal the seam allowance and also 1/2″ inside the seam allowance. In theory only the heat sealing is required, but should it fail I wanted to make sure stuff wasn’t going to fall out. The webbing and velcro across the top allow the flap to be folded over a couple of times and then buckled, so it’s waterproof:

A close up view of the top of the dry bag, showing the webbing, buckle and velcro that hold the flap closed.

I’m not totally in love with the dry bag. I had originally purchased some 1.9 ounce silicon coated ripstop, which is much lighter but would require sealing the seams. Then I got a photocopy of the article about the heat-sealed dry bags and thought I’d try that instead. We’ll see how it works. The ripstop was also a light blue, which I suspect would be easier to find in a dark camp site.

The finished weight of our prototype, with dry bag, came to 16 ounces, which is about the same as E’s current lightweight pack (which, unlike this pack, doesn’t have a hip belt). It fits me quite well, and it seemed to adjust all right to E’s height (he’s 6′ 2″, I’m 5′ 6″). We’re going to give it a test run this month.

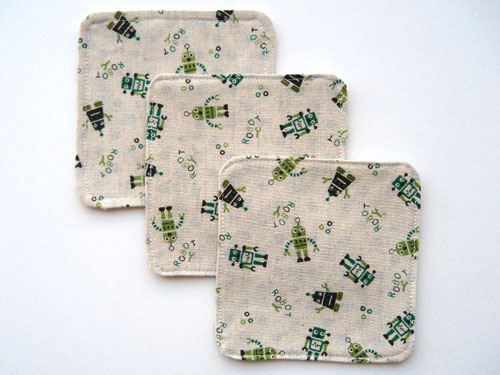
I for One Welcome Our New Robot Overlords — I Mean, Coasters
July 6th, 2011 | Link

Three square coasters made from linen fabric screen printed with green and brown robots.

Things to do when one is procrastinating and has scraps of fairly expensive Japanese fabric that are begging to have something done with them. I’ve seen fabric coasters that have batting or flannel between the layers, but I didn’t bother. Finished size is a scant 3-3/4″ on each side.

Super Fast Instructions

Cut two 4″ squares of fabric. Curve the corners to make it easier to turn them inside out (I just followed the corner curves from the card wallet pattern around each corner — they have a 1/2″ radius). Place squares right sides together (if you want to add an extra absorbant fabric layer, place it on top of the other two pieces so it’s on the inside when you turn everything right-side out).

Sew around the perimeter of the coaster with a 1/8″ seam allowance, leaving about 2″ open along one side for turning. (Backstitch and the start and end of the stitching so it holds together while you’re turning.)

Turn right-side out and press flat. Fold raw edges from opening towards the inside and press so they’re straight.

Top-stitch around the entire coaster very close to the edge (I use the 2mm marker on my sewing machine foot), backstitching at the start and end.

You’re done. I told you it was going to be super fast!

Card Wallet Pattern and Tutorial
July 4th, 2011 | Link

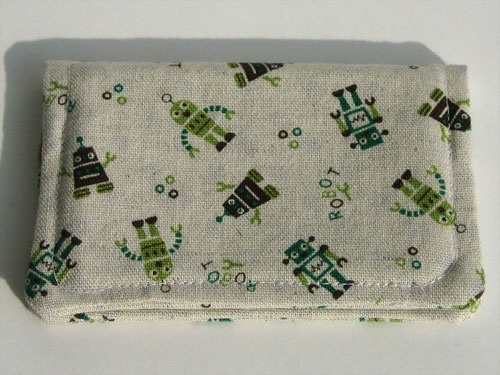
Card wallet, closed, made of linen fabric printed with cartoon green and brown robots

Longtime readers may recall the fabric card wallet I made some time back. Today as I was, well, procrastinating on writing an article about designing keyboard-only interactions for web sites, I started cleaning my studio and found a bunch of fabric I’d cut to make more robot wallets. Then I decided to procrastinate on cleaning my studio and make robot wallets instead. And then I decided to write a tutorial!

Read more…

Diagonal Lace Socks
April 24th, 2011 | Link

Diagonal lace socks, worn, showing the lace pattern mirrored on the second sock

I know I’ve said it before, that I didn’t think I’d be one of those knitters who knit socks, but every time I make another pair I remember it again.

These are the Diagonal Lace Socks from Socks from the Toe Up, which, if you’re counting, is my third pair from that book (the other two are here and here). The yarn is Malabrigo Sock again, which has turned out to be as nice to knit with as it is to weave with. I made one change to the pattern, which was to reverse the lace pattern on the right sock so that when worn the socks mirror each other.

I had these mostly finished in late February, but things have been a little crazy lately so it took me a while to get around to sewing in the ends and photographing them.

New Moon/Eclipse Scarves
October 21st, 2010 | Link

Once upon a Christmas I used my newly discovered mad weaving skillz to weave for my sister the Twilight Scarf.

Twilight Scarf

It turned out beautifully, and is my most favorited project on Ravelry. I wanted to keep it for myself, but dutifully gave it away – and promptly bought another skein of Malabrigo Sock in Stonechat to make another for myself. A few months later I bought a second skein, thinking I would make a wider scarf for my version, and then the yarn sat in my stash for a long time while I didn’t do any weaving.

Recently I went into a furious destash mode where I tried to finish all my outstanding yarn projects, and before my current crazy work project took over my life, I made a lot of progress. In fact, I destashed down to one cone of lace-weight bamboo yarn. And I finally finished not just one, but two scarves from the Malabrigo (plus the recently posted Lace and Cable socks).

Two scarves with slight variations in color variegation

Because I bought the two skeins a few months apart, there are subtle differences in the color variegation. So you can see that the scarf on the left (the Eclipse scarf) has more of the highlight color in the weft than the scarf on the right. This makes me sad, because it turned out slightly better than the one on the right (it’s longer and the selvedges are more even), but I like the resulting fabric better on the one on the right (the New Moon scarf). Here’s the Eclipse scarf:

Close up detail of woven fabric

And the New Moon scarf:

Close up detail of woven fabric in New Moon scarf

Both scarves are 72 ends, 10 dpi reed. The New Moon scarf is about 48″ long and the Eclipse scarf is about 54″ long. In other news, Ravelry finally added weaving as a category for craft, yay!

Lace and Cable Socks
October 19th, 2010 | Link

Lace and Cable Socks, front view; the yarn is self-striping in tones from burgundy to olive.

I know, I said I didn’t know if I would knit another pair of socks. But I had bought a bunch of yarn that I planned to weave with, and the weaving didn’t use nearly as much yarn as I expected, so… Socks.

These are the “Lace and Cable Socks” from Socks from the Toe Up by Wendy D. Johnson. The yarn is Malabrigo Sock in Stonechat. You’ve seen it before in the Twilight Scarf I wove for my sister a couple of years back, and you’ll see it again when I post the scarves I wove from it before I knit the socks.

Love the color. Love the natural striping that the yarn did. Love the diamond lace pattern, but it doesn’t show up very well. Wish I had use a slightly stretchier bind-off than the ribbed bind off, as it’s a bit tight getting them past my heels when I take them off. I wore them all day Sunday (I finished them a while ago, but the light wasn’t right for photographing them – too much sun!) and they were perfect for wearing around the house on a rainy day.

A Lone Sock
September 4th, 2010 | Link

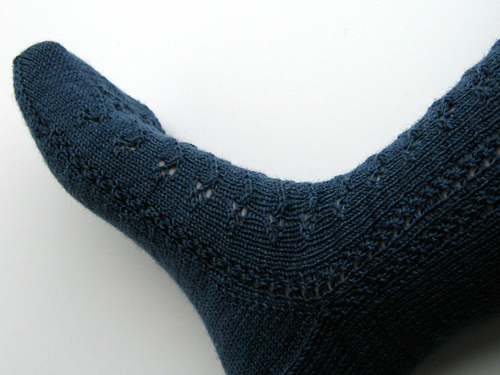
Side view of sock on foot, showing the heel gusset and the line of eyelets up the side.

I was never very excited about the idea of knitting socks, in spite of their popularity in knitting circles. I understand the appeal of a small, portable project, but I couldn’t really imagine wearing them. Socks, to me, are something I buy in the lightest possible weight, in the simplest possible style, in cotton, and preferably black.

But… I was ordering some needles from Web’s for another project, and then I started poking around the yarns, and, well, you know how these things go. I ended up with a cone of lace weight bamboo and a couple of skeins of Lorna’s Laces Shepherd Sock from their Color Commentary series, “Cookie’s Deep Dark Secret.” The pattern is “On-Hold Socks” from Socks from the Toe Up by Wendy D. Johnson.

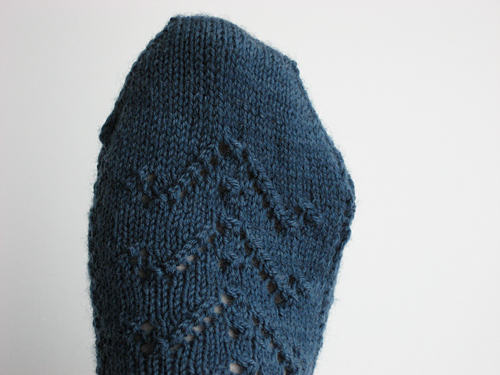
Detail view of the chevron lace repeating up the top of the sock

I finished the first sock (pictured) and I’m about to start on the heel gusset for the second. The needles are tiny (2mm!) but there’s something about the precision of small, neat stitches that I find appealing — I hear people get bored and have trouble finishing the second sock, but I’m not hitting that. And I’ve learned some new techniques: Judy’s Magic Cast-on for a perfect, seamless toe; and knitting socks in the round using two circulars rather than double-pointed needles, a technique I’ll probably use everywhere I used to use DPs because there are no ladders between the stitches that were on different needles. I like the two circulars in conjunction with the toe-up method of knitting socks because it’s easy to try on the sock to check the size, because the cables are flexible and the stitches don’t slide off.

So the whole sock experience has been surprisingly fun! I still don’t know if I’ll wear them or knit another pair, but I’m glad I tried it out. See my Ravelry project for more details and photos.

Upstairs Shawl
August 10th, 2010 | Link

Folded shawl

I finished knitting my Upstairs Shawl in July, but I didn’t get around to blocking it until last Sunday. (I also blocked two hats and a pullover. It was that kind of day.) Though I blocked it to 20″ x 58″, it eased back to 18″ wide after I took the pins out — the final size in the pattern is 22″, so maybe I need to block it again? Or maybe I can live with it.

Lace detail for Upstairs Shawl

In this fog-diffused San Francisco morning light, you can see the subtle striations in the yarn color. It’s my favorite thing about this piece.

More Japanese Sewing: Wrap Skirt and T-Shirt
July 11th, 2010 | Link

Posing on a rock in front of a bunch of bamboo

One thing I love about the morning fog: it diffuses light wonderfully for photography. And it usually burns off by noon.

I’ve been searching for the perfect -shirt pattern and thought I had it with my tweaked version of Jalie 2805, but this basic t-shirt from Overlock Sewing Everyday Clothes might beat it out as my favorite. Like the Jalie pattern, this one comes with several variations on the sleeves and neck, and the book includes patterns for several other top and tunic styles, a couple of skirts, camisoles and leggings. (I love everything about the outfit shown on the right in this picture – I even bought a pair of black patent ballet flats to reproduce it, and I have some deep red silk/cotton poplin earmarked for the skirt) The amazing thing is that the tutorials in the book are so clear–even though I don’t understand Japanese–that I learned more from them than the English-language serger book I have!

Front detail showing the tie

The wrap skirt is from One Day Sewing Winter Clothes (2007). This is less than an evening’s work. It took me a while to figure out how to work with the pattern, as there were only two pieces on the pattern sheet: turns out that those two pieces had a center mark that I needed to mirror to get the front skirt and facing. Also, for some reason I spaced on the facing and was convinced it was a waistband, and couldn’t figure out how the top of the skirt pieces were supposed to match up. Doh.

Back view of wrap skirt

This was going to be a muslin from leftover stretch denim, and then I was going to make it up in a lighter weight gray stretch denim that I bought recently from fabric.com. But it turned out well enough that I’m going to save the gray denim for something else. I love this style though, its simplicity and architectural line, and I kind of want to make another one in black, a little shorter, maybe reversible with a crazy print for the other side…

Work in Progress: Upstairs Shawl
July 6th, 2010 | Link

Shawl and yarn detail

I started this project as plane knitting for my trip to Calgary in May, and now it was also plane knitting for my trip to Las Vegas. It’s the Upstairs Shawl from Ravelry (requires an account to view the pattern, but if you’re a knitter, you need a Ravelry account!), in handpaintedyarn.com lace. It’s a simple lace pattern repeating over 11 stitches and 32 rows (with 105 stitches per row, including a garter-stitch border) and I memorized it quickly, but with the lace-weight yarn it’s going very slowly. I’ve knit about 36″ so far, and I’d say I’m a little over half-way through the ball, and that’s probably about 44 hours of knitting time (it takes me about 4 hours for a repeat). Fortunately, not all of that was in airports or on planes. At my current rate, I figure I’ll finish it around September.

This is the same yarn I used for my sister’s Clapotis scarf and the Mockingbird handwoven scarf. Great yardage (850 yards per skein) with saturated colors and lovely subtle shifts in the deep blue. But there are many places where the yarn is so finely spun that it’s little more than a thread, so I’m always afraid that I’m going to break it. That could just be from the Mockingbird experience, when I foolishly used it as a warp thread – I’ve never actually broken it knitting.

Search

About

My name is Shannon Hale. This blog is on indefinite hiatus, but it contains archives of the last 10 years of posts about bookbinding, knitting, sewing. and other random things in my life.

Previously

2014: 1 2 3 4 5 6 7 8 9 10 11 12

2013: 1 2 3 4 5 6 7 8 9 10 11 12

2012: 1 2 3 4 5 6 7 8 9 10 11 12

2011: 1 2 3 4 5 6 7 8 9 10 11 12

2010: 1 2 3 4 5 6 7 8 9 10 11 12

2009: 1 2 3 4 5 6 7 8 9 10 11 12

2008: 1 2 3 4 5 6 7 8 9 10 11 12

2007: 1 2 3 4 5 6 7 8 9 10 11 12

2006: 1 2 3 4 5 6 7 8 9 10 11 12

2005: 1 2 3 4 5 6 7 8 9 10 11 12