Some Sewing Tips and a Wardrobe Remix
August 31st, 2008 | Link
Still on a sewing kick. I found a few useful links recently:
I took a critical look at my wardrobe this weekend and thought hard about the pieces I like (or don’t), the pieces I wear (or don’t), and the pieces I would like to have (but don’t). A lot of clothes went to the donation pile, including some that I liked passably but rarely wear because they are difficult to launder or press, or that don’t fit me well and are beyond my ability to alter; and some that I don’t wear because they don’t fit my style. What’s left are pieces I wear all the time, or are my favorite dressy pieces. What’s coming are a couple more casual-to-business-casual skirts and pants, some dressier t-shirts and tops to wear to work with all my skirts and jeans, and a couple of classic shift dresses. I’m sticking with my mostly black and gray palette, with a few whites and bolder colors (mostly reds) mixed in. I bought a few yards of new fabric—cotton twill in a couple of neutral colors, and some cotton and rayon knits—to fill in some of the gaps: I’ve realized I like the comfort and easy care of knits, and they don’t have to look as casual as my uniform Gap T’s. What I hope to get out of this exercise is a wardrobe that I’ll wear all the time, that I feel good in, and that looks like I thought about what I put on.
¶ Posted in
Cloth | Tags:
sewing |
Comments Off on Some Sewing Tips and a Wardrobe Remix
Black Corduroy Messenger Bag
August 27th, 2008 | Link
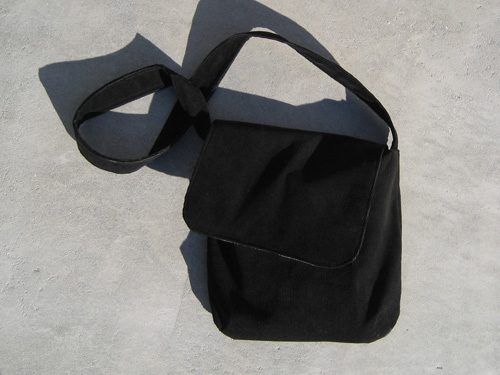
I have a small blue Jack Spade messenger bag that I like a lot, but I often wish I had bought a black one instead. I bought some black corduroy with the intention of reverse-engineering the original bag and making my own—that was months ago. But BurdaStyle recently put up a pattern for a messenger bag, so I decided to try that out. I changed the pattern to be an inch narrower and an inch shorter, and the resulting bag is just the right size for a magazine or a couple of books, sunglasses, and wallet. I lined it with a fun, bold Prints Charming cotton print left over from a skirt I made last January. (There’s another view of the bag on the Burda Style site that shows the lining.)
If I were going to make another—and I might (I’m such a bag geek)—I would probably add a zipped pocket inside and a loop for keys, and make the strap adjustable. It’s very quick to sew once you get all the paper taped together to construct the pattern pieces.
¶ Posted in
Cloth | Tags:
sewing |
Comments Off on Black Corduroy Messenger Bag
Random Sewing Blather
August 11th, 2008 | Link
Reason number 7,534 why I love the internet:
I found myself on the Wardrobe Refashion site yesterday, and in particular this post about the Sadie top that the writer had sewn from organic bamboo jersey. I haven’t tried this variation of the top because the fabrics I had don’t drape very well, but hers is beautiful! I followed the link to the sewer’s blog and read how she adapted the Sadie pattern to get the softer drape, and as I read further found a link to a post on how to work with stretch fabrics. And there, folks, appears to be the answer to my stretched out t-shirt seams. Yay!
Discount Fabrics has begun carrying a small selection of organic fabrics in their new location on 11th Street between Howard and Folsom in San Francisco, so I picked up a yard of bamboo jersey there yesterday and I’m going to have a go at that Sadie variation. The bamboo fabric is super drapey and has a slight sheen to it, so I think it will look great as a dressier top.
I spent some of the weekend working on Burda 8601 (view B, without all the foufy lace—I’m shooting for something more like this variation), which may have been just a touch beyond my sewing skills (the fact that I made it from Dupioni silk, which is very fine, may not have helped) but it came out all right. I took out the side zip in favor of a corset-style lacing up the back. It’s hard to say how it’s going to fit—I still have to put in the eyelets for the laces—and I’m a little nervous about how it will stay up! Hoping to finish it sometime this week.
¶ Posted in
Cloth | Tags:
sewing |
Comments Off on Random Sewing Blather
One More Sadie Top…
August 5th, 2008 | Link
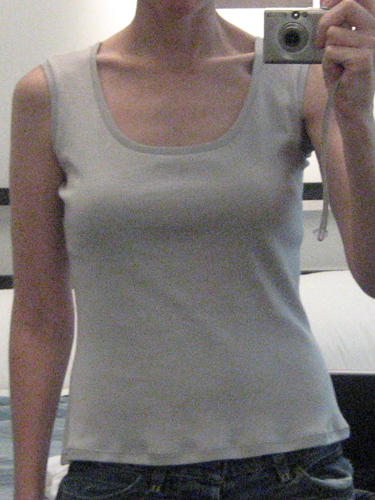
I had a couple of hours to spare before E. gets home, so I thought I’d do one more Sadie top. This knit is heavier than the other two and came from a sample sale at Discount Fabrics. I didn’t try to hem this top, as I want to explore the stretching problem first. But I did redraft the pattern a little: I dropped the arm holes almost an inch, and I took in about an inch of the width I’d added to the bottom (it’s still wider right at the waist, but tapers in again at the hips):
This one is almost perfect. If I can work out my top-stitching and hem problems, I’ll be very happy with it. I do love how fast they come together with the serger!
¶ Posted in
Cloth | Tags:
sewing |
2 Comments »
Maybe I Should Stick with Wovens…
August 5th, 2008 | Link
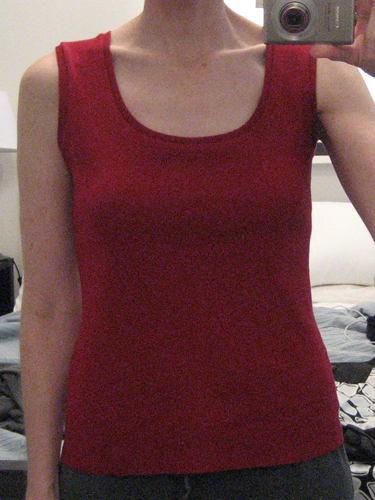
Yesterday I suffered a spectacular failure sewing the Sadie tank top pattern from Burda Style web site. I used the size 34 version, and smoothed it into a size 36 from the waist-line down for a little extra ease. The fit was fine, but I had some problems with the neck and arm openings:
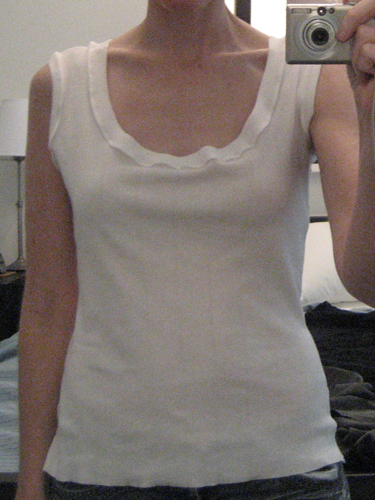
I think the problem was a combination of things: I should have pulled the ribbing fabric tauter when I sewed it to the body; I should have used a longer stitch length on the serger so that the body fabric would ease in; and I totally stretched it out when I topstitched with the twin needle. Keeping all that in mind, I had another go at the top today, and here’s take two:
As you can see, the neck and arm holes are much better here. But I still got a lot of stretching and flaring when I hemmed the bottom with the twin needle on my sewing machine, so I haven’t done the top-stitching on the neck and arm holes because I don’t want to totally ruin it. I think it’s a tension thing, or the feed dogs stretching the fabric out on the bottom.
On the bright side, I bought both fabrics for $1.99/yard from fabric.com when they had a sale on baby-rib knits, so I’m not too upset about it. A little frustrated, but not upset. The second top is wearable. I like the fit and the shape on the whole: I dropped the bottom of the armhole opening about 1/2" on the second top and I think its still a bit high (note the bunching under the arms), so I’ll try dropping it some more. I could see making a few of these for summer tops or layering for work, once I get the kinks worked out.
¶ Posted in
Cloth | Tags:
sewing |
3 Comments »
Serging Forward
July 27th, 2008 | Link
A coworker and I are taking the "Hems and Basic Alterations" class at Stitch Lounge. I have problems with fitted shirts because if they fit in the shoulders, they usually hang off me everywhere else, so I’m hoping to learn how to take in a shirt so that it fits properly (since I haven’t yet made that bold step forward to the shirt pattern from the Sew U book). In the first class we covered mostly hemming, but in the second class we will be bringing in clothes that we want to alter. Even though hemming seems like a really basic thing, I learned a few things from the first class: how to hem drastic curves by adding 1-2 basting lines inside the seam line (the same technique used for setting in sleeves, which has always intimidated me), and decorative hems using a twin needle. So I had to try that out for myself on this, Sew U skirt number nine:
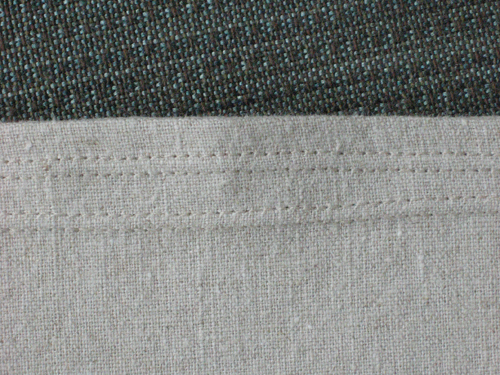
(I missed catching the edge of the folded-over fabric off and on the first time, so I added another double row 1/4" in. As we say in the software business, "It’s a feature.")
The other exciting thing about this skirt (which, yes, is the same linen as the tote bag I made last weekend) is that it is my first big project using the brand new serger that E. bought me for my birthday (even though he couldn’t understand why I would choose a serger over a new iPhone). Here’s the inside view of the hem and side seam:

Isn’t that pretty? And it’s so much faster than pinking the seams or zig-zagging around the edges, or having to fold the hem under twice. I’m looking forward to trying out some patterns for knit fabrics, too.
I won’t show you the finished skirt because I don’t consider it finished yet: I’m looking at the clean lines of the plain linen fabric as a blank canvas, and planning on making use of some of the techniques in Printing by Hand: A Modern Guide to Printing with Handmade Stamps, Stencils, and Silk Screens to complete my masterpiece. Stay tuned…
¶ Posted in
Cloth | Tags:
sewing |
Comments Off on Serging Forward
Bagged
July 20th, 2008 | Link
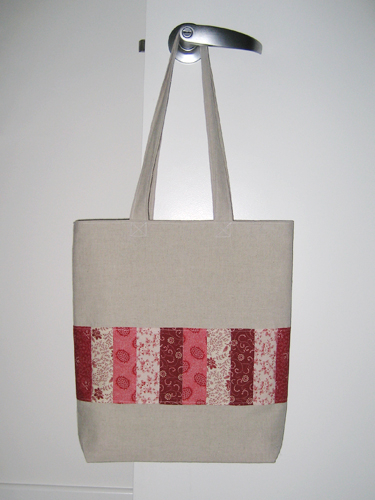
One of my favorite combinations is natural linen and red fabric. I bought these red and white quilting fabrics when I lived in Calgary. I think I was planning on a Log Cabin quilt in red and white. But I haven’t quilted in a while, and I’m trying to clean out my fabric stash, and I need a birthday present for my mom. So that’s where this fell out.
The structure of this bag isn’t much different than the grocery bags I made last year. I cut the bag rectangle 15 1/2" wide and 34" long, and sewed the gussets about 1 1/4" in from the corner. The big differences are that I lined this bag (I just made two bags, and sewed them together wrong-sides facing when I sewed on the handles) and added the red and white panels to the front and back.—nothing fancy, I just strip-pieced them and sewed them on top of the linen. I also ironed some medium-weight fusible interfacing to the lining to give the bag more body, since it turned out bigger than I was thinking when I started the project.
Originally I thought I would Gocco-screen something on the fabric, but I chickened out. However, I have quite a lot of this linen—it’s from my mom’s stash and it must have been on sale, or she was planning on making the entire family matching outfits, there are yards of it—so there will be many more opportunities.
My studio looks like a fabric tornado hit it, oy.
¶ Posted in
Cloth | Tags:
sewing |
Comments Off on Bagged
Busy Days
July 13th, 2008 | Link
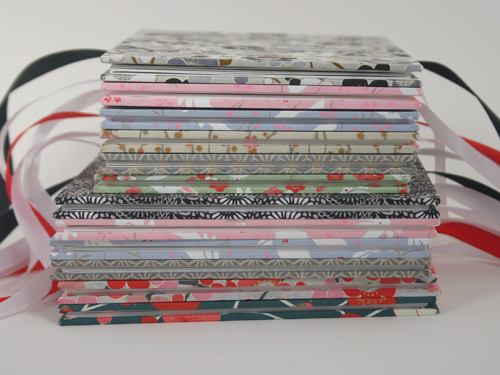
The last few weeks have been incredibly busy, between work and school. I’ve only been able to grab little pieces of time for bookbinding: cutting boards, sanding, choosing and cutting cover paper. So over time my studio filled with little stacks of books to be, just waiting for a chance to sit down and finish everything.
Well, that was this weekend. Since Friday night I’ve assembled 12 accordion books (shown above) and seven Coptic-bound journals. I think I am booked out for a while. I feel like doing some sewing!
¶ Posted in
Paper | Tags:
bookbinding |
Comments Off on Busy Days
Where I Buy Decorative Paper
June 13th, 2008 | Link
A lot of people ask me where I get the papers I use to cover books. I get them from a few different sources, both online and off, but most of them come from the following resources online:
- Paper Mojo
Paper Mojo carries a good selection of Japanese prints and will also order any style you wish from the Japanese Paper Place in Toronto (which does not do online retail) with a three-sheet minimum. I also like the Whimsy Press papers and the Pasticcio prints (although I’ve had mixed success using them for covers—they bubble).
- Paper Source
Paper source has a nice selection of Japanese prints and a limited selection of Lokta bark solids. They also carry a number of Italian text blocks, including a few sizes of photo albums with black pages. Text blocks are sold with cover boards that are already cut to the proper size, which can be a bonus if you can’t cut a 90° corner to save your life.
- Paper Studio
I just received my first order from Paper Studio today, and I will be ordering more from this store. They have a good selection of Chiyogami and Lokta bark. They also ship USPS Priority Mail, so the order I placed Tuesday arrived in time for the weekend, a fact that I appreciate.
- Hollanders
I mostly buy text blocks from Hollander’s, although you have to do some comparison shopping on their prices: the graph paper block, for example, is $1.50 cheaper from Paper Source, and Paper Source includes pre-cut cover boards. I do buy Brookfield Letterpress papers here, and Lokta bark papers. Sometimes I buy Chiyogami paper here as well, though their new online store setup makes browsing difficult—it’s too broken up, and displaying two of each paper design means you have to go through twice as many pages.
- Talas Online
Talas has a very limited selection of Chiyogami paper. They have a great selection of book cloth, and their prices for book cloth are better than Hollander’s. I buy all my book board here, a lot of my page papers, and most of my other bookbinding supplies and tools.
There are also a couple of stores in San Francisco that I visit on occasion:
- Paper Source
I usually order online from Paper Source, but sometimes if I need something in a hurry or I’m in the neighborhood, I’ll go to their store on Fillmore.
- Kozo Arts
Kozo Arts does not sell paper online, but they have a lovely selection of Japanese papers in their store on Union Street, and this is where I buy the monkey paper—when they have it in stock. They had a store in the Westfield Mall downtown for a while, but it’s closed now.
- Flax
Flax is a large art supply store at Market and Valencia in San Francisco. They have a huge paper room with an overwhelming amount of decorative paper from all over the world. I sometimes buy novelty papers here (this is where I found the Italian dog print) or Chiyogami, but I usually only go when I need some other art supplies.
¶ Posted in
Paper | Tags:
bookbinding |
Comments Off on Where I Buy Decorative Paper
Alphabet Book
June 11th, 2008 | Link
Because I haven’t been busy enough lately, I decided to take a graphic design course this summer through UC Berkeley’s extension program. I’ve actually been wanting to do this for several years, but my last company didn’t have a tuition reimbursement program, and my current employer does. Yay!
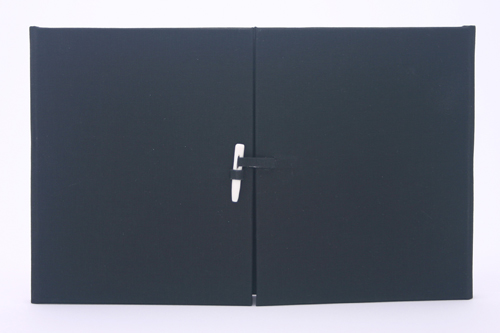
Our first assignment was an alphabet book (really a scrapbook, though I somehow glossed over that part in my head when I was thinking about the assignment), in which we were supposed to work with images that visually resonated with us. In my case, I decided that the things that resonate with me are (1) book structures (duh), (2) typography, (3) paper, especially the Japanese papers, and (4) the color red.
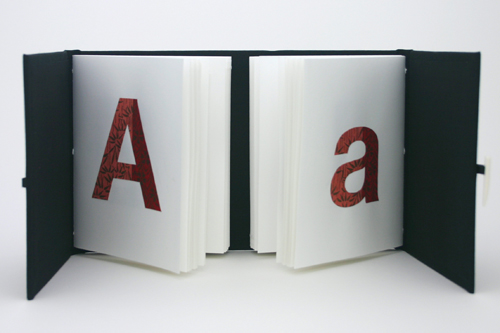
I decided on a gatefold book structure because I thought it would be cool to have the upper and lower case letters facing each other in their own book. Each letter is cut from a different Chiyogami/Yuzen paper, with the upper- and lower-cases matching. As a bonus, if you’re kinda geeky, you can create the entire periodic table of the elements: Fe, He, etc. The typeface is Helvetica Neue Bold, chosen mainly for its uniformly wide strokes which were easy to glue, and also because I figured I would have lost a finger for sure if I had to cut serifs with an Exacto knife!
The paper is Mohawk Superfine 100lb text. Each side is a single section of 13 sheets, pamphlet-sewn into the spine. My measurement for the front and back cover boards did not take into account the hinging and additional width of the spine piece (since I sewed the sections into 5/16" wide spine boards with 1/4″ for the hinges), and as a consequence the sections are slightly too far apart: I would have preferred them to be almost flush. But on the whole I like the way it turned out.
(I dropped the color red from the mix. I have a stunning silk-like red book cloth that I almost covered the book with, but I decided it would detract from the Japanese papers, and I went with black instead. It was a smart decision.)


